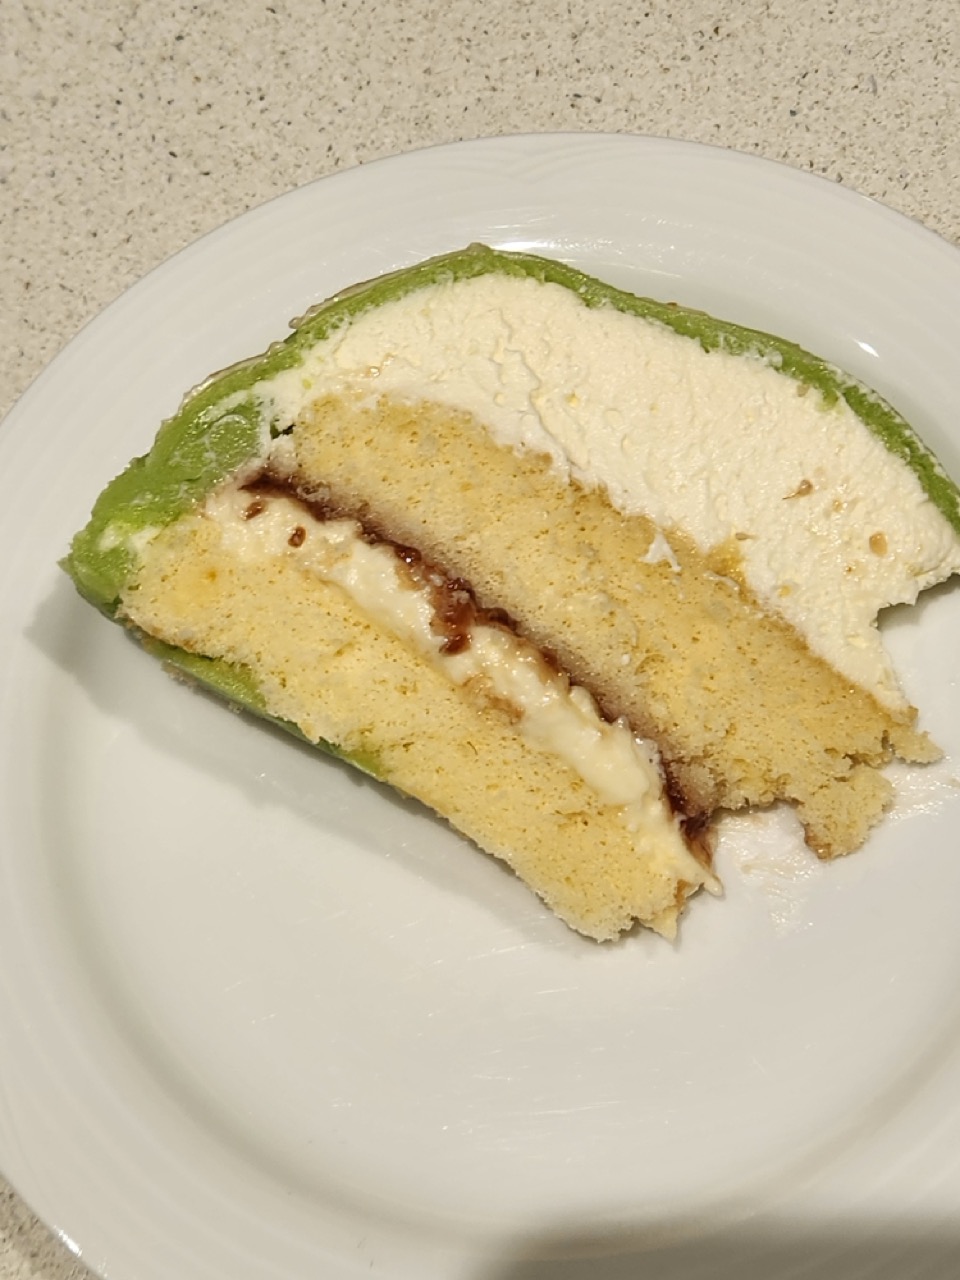
Princess cake
Princess cake (or Prinsesstårta) was a mainstay of my childhood. We would often pick up a few slices from a chain of Swedish bakeries in Perth called Miss Maud, and it was frequently chosen as a birthday cake by my grandmother (it being her favourite cake).
Below is a recipe adapted from the New York Times for a homemade princess cake.
INGREDIENTS
Sponge cake
- 50g olive or vegetable oil
- 4 large eggs (separated, room temperature)
- 100g sugar (divided in two)
- 1/2 tsp kosher salt
- 1/4 tsp cream of tartar
- 85 grams cake flour
- 2 tsp vanilla extract
Custard
- 2 large egg yolks
- 30g granulated sugar
- 15g cornflour
- 1 tsp vanilla paste
- 180ml milk
- 15g unsalted butter
Marzipan
- 500 grams marzipan
- Icing sugar (for dusting)
- Green food coloring
Mascarpone whipped cream
- 480ml cream
- 225g mascarpone
- 75g powdered sugar
- 2 tsp vanilla paste
Assembly
- 150g raspberry jam
STEPS
Sponge cake
-
Arrange an oven rack in the center of the oven and heat the oven to 160ºC.
- If baking in a 9-inch springform pan, leave the pan ungreased and unlined.
- If making a roulade, brush the bottom of a 10-by-15-inch pan with a light coating of oil — do not brush the sides, as the cake needs to be able to cling to the pan as it rises. Line only the bottom of the pan with a piece of parchment paper, smoothing to eliminate air bubbles.
-
Beat the egg whites: In a wide, medium bowl, combine the egg whites, half the sugar, the kosher salt and cream of tartar. Beat the mixture with a hand mixer fitted with the beaters on medium-low speed until the mixture looks frothy, then start to slowly increase the speed to medium-high. Continue to beat the egg whites until you have a dense, voluminous, glossy foam that forms stiff peaks, about 4 minutes. When you lift the beaters out of the bowl, the egg whites should come to a straight point that doesn’t droop. Don’t beat beyond this point, or the whites will become dry and lumpy. Set the bowl aside.
-
Beat the egg yolks: Beat with the hand mixer(no need to wash it after you beat the egg whites) on medium-high until the mixture is very pale and fluffy and forms a slowly dissolving ribbon as it falls off the beaters back into the bowl, about 4 minutes. Slowly stream in the oil, beating constantly to ensure it emulsifies into the yolk mixture, until you have a smooth, light mixture that looks like mayonnaise.
-
Fold in the flour: Reduce the mixer to the lowest speed, add half of the flour and mix just until incorporated. Add the vanilla extract and 1 tablespoon water, mix until incorporated, then add the remaining flour and mix just until it disappears. The mixture will have thickened and look a bit like cake batter. Fold the yolk mixture once or twice with a large flexible spatula to make sure it’s evenly mixed.
-
Fold in the egg whites: Scrape about a third of the egg white mixture into the yolk mixture and thoroughly fold in the whites until the mixture is loosened. Working more gently, fold in half of the remaining egg whites until only a few streaks remain. Fold in the remaining whites, scraping the bottom and sides of the bowl, until you have a light, smooth, evenly mixed batter.
-
Bake: Scrape the batter into the pan and smooth into an even layer. Firmly rap the pan on the surface once or twice to pop any large air bubbles. Bake the cake until it’s golden brown, firm and springy to the touch across the entire surface, 25 to 30 minutes for a jelly roll and 30 to 35 minutes for a 9-inch cake.
-
Cool: Remove the cake from the oven and immediately invert the pan onto a wire rack. Let the cake cool completely upside down to prevent it from collapsing.
-
Reinvert the cooled pan and cut along the sides with a small offset spatula or paring knife to loosen the cake. It will sink a bit, which is normal. If making a jelly roll, turn the sponge out onto the wire rack and peel off the parchment. If making a 9-inch cake, remove the ring of the springform pan, invert the cake onto the rack, and carefully peel off the bottom of the pan (it should come away cleanly, leaving behind just a thin film).
Custard
-
While the cake bakes, make the custard: Whisk together the egg yolks, sugar, cornflour and vanilla in a small saucepan until combined, followed by the milk.
-
Cook the custard over medium heat, whisking continuously, until thickened, 2 to 3 minutes. Once boiling, turn the heat to low and whisk for 30 seconds longer. Turn off the heat, then whisk in the butter. Pour into a heatproof container and press plastic wrap or parchment paper directly against the custard to prevent it from forming a skin. Once cool to the touch, refrigerate to chill, at least 1 hour.
Marzipan
-
Once the cake and custard have cooled, prepare the marzipan coating and decoration. Dust your work surface with powdered sugar, then knead the marzipan with one or two drops of green food coloring until it is an even pale mint green. Add more powdered sugar whenever the marzipan is sticky. If it feels dry or starts to crack, moisten your hands slightly (shaking off any excess water) and knead until smooth. The marzipan should be pliable but not sticky throughout the process. When you are happy with the color, form the marzipan into a 5 inch diameter disk.
-
Dust the smooth surface with powdered sugar. Roll out the marzipan disk, turning it a quarter way around between each roll to maintain the circular shape, until 14 inches/36cm in diameter and 3mm thick. As you work, dust the marzipan and surface with powdered sugar as needed to prevent sticking.
-
Roll the marzipan over your rolling pin, and unroll it over an ~9 inch diameter bowl, dusted side down. Encourage the marzipan to take the form of the bowl by lifting it and gently pressing it into place, ensuring that the marzipan overhangs the edges of the bowl by about 1 inch. If you need to start again, you can simply remove the marzipan and re-roll it as before, adding more powdered sugar if it’s too sticky or dampening your hands if it’s too dry. Once finished, cover the bowl with a damp cloth to prevent the marzipan from being exposed to the air and drying out or cracking.
Mascarpone whipped cream
- Whisk all the ingredients together using an electric hand mixer or stand mixer until very stiff peaks form. This is the cement of your cake, so it needs to be stiff enough to provide structure.
Finish the custard
- To finish the custard, beat the cooled custard using an electric hand mixer or stand mixer until smooth. Fold in 150g of the mascarpone cream until thick and airy. Refrigerate until ready to use.
Assembly
-
Pile 2 cups (350g) of the remaining mascarpone cream into the marzipan-lined bowl, smoothing it with a spoon or offset spatula. Spread an additional scant cup (125g) of cream evenly up and around the walls of the marzipan, going all the way to the top.
-
Using a serrated knife, cut your spongecake evenly in half to form two rounds. Place the top half, cut side up, over the cream into the bowl. Spread the raspberry jam on top of the cake, followed by all of the custard, smoothing it all the way to the edges.
-
Place the remaining cake half, cut side down, onto the custard. Using the remaining 100g mascarpone cream, fill in any gaps around the sides of the cake. If there aren’t any, spread it all over the top of the cake.
-
Trim the marzipan lining with scissors or a sharp knife so that there is an approximate 1/2-inch border once it’s folded up and over onto the cake. Lift and fold the marzipan onto the cake.
-
Place a serving platter upside down onto the cake and, gripping the bowl and plate at the same time, confidently flip it over. Carefully lift the bowl off to reveal your princess cake. Use the palms of your hands to gently pat the cake into shape, especially if you’ve used a bowl with an angular base.
-
Use a dry pastry brush to dust off any excess powdered sugar, then wet the brush for a final touch up, brushing to erase any last bits of dusty sugar. Refrigerate the cake for at least an hour before serving.
NOTES
The princess cake can be refrigerated for up to four days. If you’d like, cover it with a cake dome or overturned bowl.
This page contains the following recipe components: Sponge cake.